Office 365 Sharing Files and Folders
When you save your files in Office 365, for applications such as OneDrive, Teams or SharePoint, sharing your files is the same, regardless of the application in which you are working.
NOTE: If you have not yet uploaded your file to an online location in Office 365, you need to do this before trying to share the file with others.
To share a file or folder:
- Do either of the following:
- For an open file, select the Share button at the top right of the window.

- While viewing the listing of files or folders in a browser, select the file or folder by clicking the radio button to the left of the file/folder name and click the Share button in the top navigation pane.
- For an open file, select the Share button at the top right of the window.
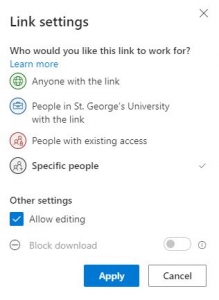
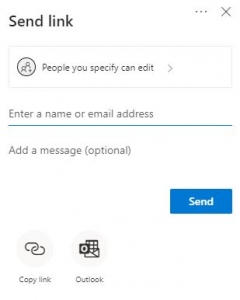
- Select the button labelled People you specify can edit to choose permissions for the link you will be sharing.
There are four options, as described below:
-
- Anyone with the link (anonymous access)
(NOTE: This option is strongly discouraged for security reasons.)
If you previous shared a file with anonymous access, to remove access to the file, click the three dots on the Send link dialog box to delete the anonymous link.

- People in St. George’s University with the link (all persons with @sgu.edu email addresses)
- People with existing access.
- Specific people (only persons you identify will have access – Recommended Option)


- Anyone with the link (anonymous access)
- If you would like persons to only view the document and not edit it, deselect the Allow editing checkbox.
- Click the Apply button, to save the permissions.
- For the specific people option, enter the name or email address of each person and select each name from the drop down which displays. Optionally, type a message.
- Click the Send button. (Alternatively, you can select Copy Link and send the link in an email.)